Season 1 Guide
The Ultimate Last War Season 1 Week 1 Guide: Mastering the Crimson Plague
A detailed first-week Last War Season 1 guide covering the virus action cycle, The Purge, Serum Collection, weather tactics, and Kimberly's Rocket Shadow unlock.
Entering Season 1 of Last War is a transformative experience. The introduction of the Virus Resistance system and the Weather mechanic changes how you approach every rally, farm, and timing window across the map.
This detailed Last War Season 1 Week 1 guide breaks down the essential strategies for the first seven days so you can maximize Virus Resistance, keep your alliance on pace, and compete for top leaderboard rewards before the season snowballs away from you.
Key takeaways
- Day 1 is about establishing the Virus Research loop, minimizing troop losses, and understanding how The Purge rankings work.
- Day 2 focuses on the Genetic Research Project, Serum Collection efficiency, and spending fragments correctly before the weekly reset.
- Day 3 activates the weather system, making farming, rallies, migration, and PvP timing much more strategic.
- Day 4 brings Kimberly's Rocket Shadow, one of the biggest early-season power spikes for players prepared to unlock it.
Profession quick pick
Engineer
Best for most players
Choose Engineer if your focus is efficient growth, better upgrade pacing, and stronger long-term account value.
- F2P friendly
- Better resource efficiency
- Useful alliance support value
War Leader
Best for aggressive PvP
Choose War Leader if you plan to lead rallies, fight constantly, and trade long-term efficiency for stronger combat impact.
- Better for whales and rally leads
- Stronger offensive pressure
- Higher value in active war play
Day 1: Establishing the Foundation and The Purge Begins
The first day of Season 1 is centered around Objective 01-02. Your first priority is reducing the virus's impact on your troops while building the infrastructure that keeps your account progressing through the opening outbreak.
This is the day where strong accounts separate themselves from casual ones. If your Virus Resistance starts behind, everything else becomes harder: zombie hunting, rally efficiency, event ranking, and even basic survival against infected content.
- Treat Virus Resistance as a mandatory combat stat, not a side upgrade.
- Start feeding the Mutant Crystal loop immediately so your early upgrades do not stall.
- Coordinate with alliance members early because leaderboard performance depends on timing and coordination, not just raw power.
Day 1: The Virus Action Cycle
To progress through Season 1, you must master the loop between the Virus Research Institute and Protein Farms. Step one is hunting Zombies, which are marked by the magnifying glass on the map, to earn Mutant Crystals. Step two is spending those crystals to upgrade your Virus Research Institute. Step three is using that upgraded system to advance Protein Farms so they can produce Immune Proteins.
This loop is the foundation of your Week 1 success. High Virus Resistance is not optional. If your resistance is low, you will suffer enormous troop losses and deal dramatically less damage. If you are too weak to attack efficiently alone, use the safe Loki-style workaround: launch a rally on a Doom Elite with a single low-command hero, then let stronger allies finish the fight so you still receive Mutant Crystals with almost no losses.
- Step 1: Hunt Zombies to earn Mutant Crystals.
- Step 2: Use Mutant Crystals to upgrade the Virus Research Institute.
- Step 3: Upgrade Protein Farms so they can produce Immune Proteins.
- If your resistance is low, use a low-command Loki rally setup to claim Mutant Crystals safely.
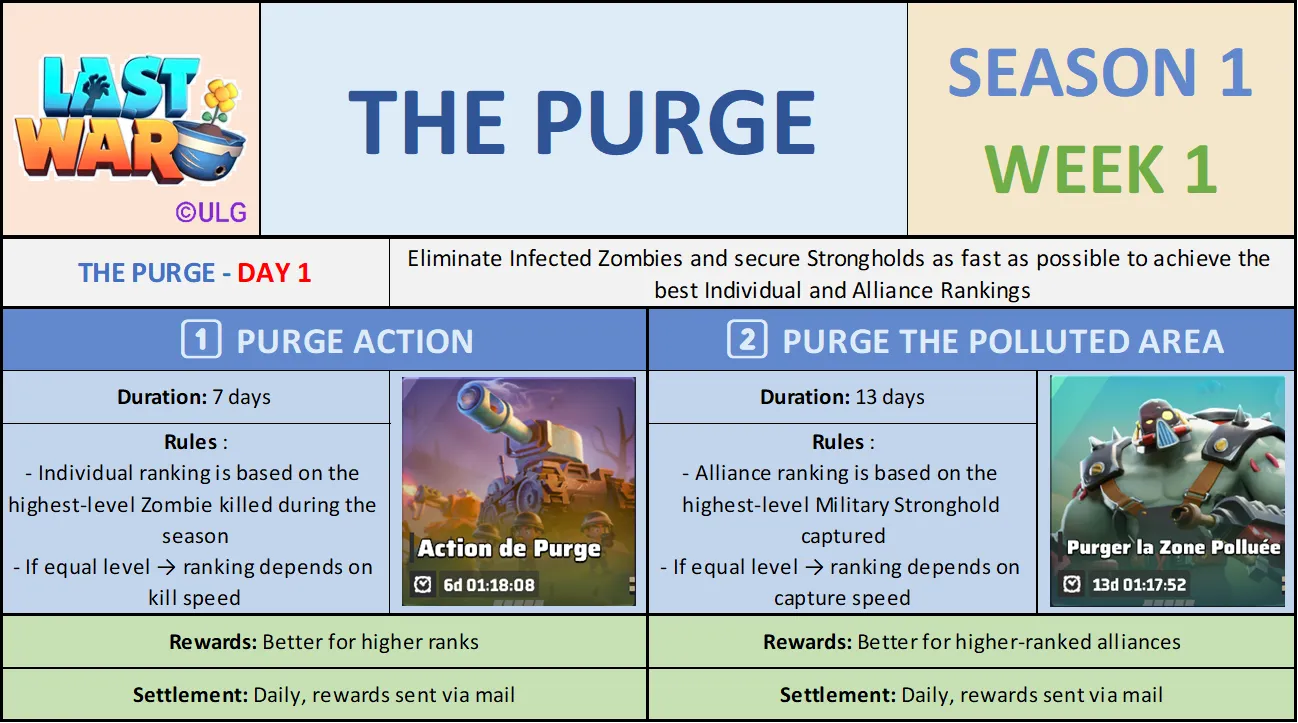
Day 1: The Purge Event Launch
The Purge starts immediately and becomes one of the most important performance benchmarks of the opening week. The event tracks both individual commander performance and alliance-level coordination over multiple days, so it rewards planning rather than random aggression.
The Individual Purge lasts 7 days and ranks commanders by the highest-level Zombie they kill. If two players clear the same level, the faster kill speed wins the tie. The Alliance Purge lasts 13 days and focuses on Military Stronghold captures. Your alliance ranking depends on both the stronghold level and how quickly your alliance secures the objective. Rewards settle daily and arrive directly in your in-game mail.
- Individual Purge: highest-level Zombie kill over 7 days determines rank.
- If tied on Zombie level, the fastest kill speed wins.
- Alliance Purge: capture Military Strongholds over 13 days to improve alliance rank.
- Rewards settle daily and are delivered through in-game mail.
Day 2: Objective 03 - Serum Collection and Genetic Research
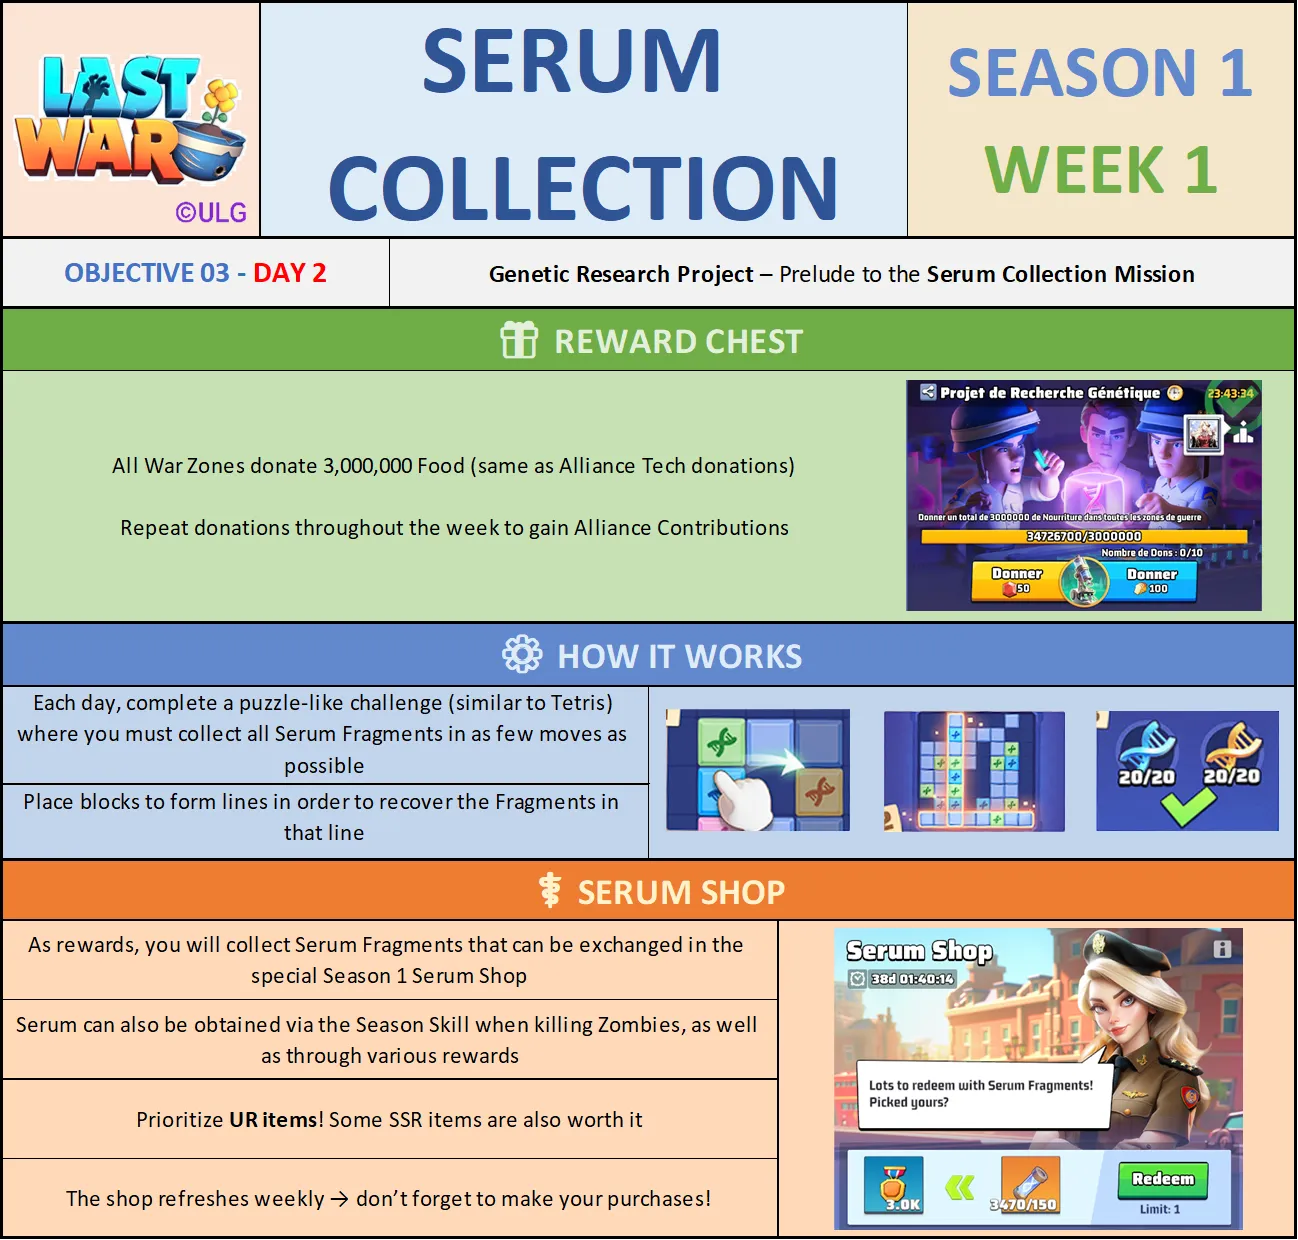
On Day 2, the Genetic Research Project begins and demands a large collaborative push from the entire War Zone. Every commander should contribute toward the 3,000,000 Food donation target. The system functions similarly to Alliance Tech and also increases your Alliance Contributions, so ignoring it slows both the server and your own progress.
At the same time, the Serum Puzzle minigame opens. This Tetris-style challenge asks you to clear lines of blocks to recover Serum Fragments. Efficiency matters here. The fewer wasted moves you make, the better your fragment collection pace becomes.
Once you have fragments, spend them in the Serum Shop with discipline. UR items should always be your first priority. The shop refreshes weekly, so there is no benefit to hoarding fragments beyond the timer unless you are intentionally waiting for a specific purchase before reset.
- Contribute to the 3,000,000 Food donation goal as early as possible.
- Treat the Serum Puzzle as an efficiency challenge, not just a participation task.
- Buy UR items first in the Serum Shop.
- Do not carry Serum Fragments past the weekly reset without a reason.
Day 3: The Weather System Goes Live
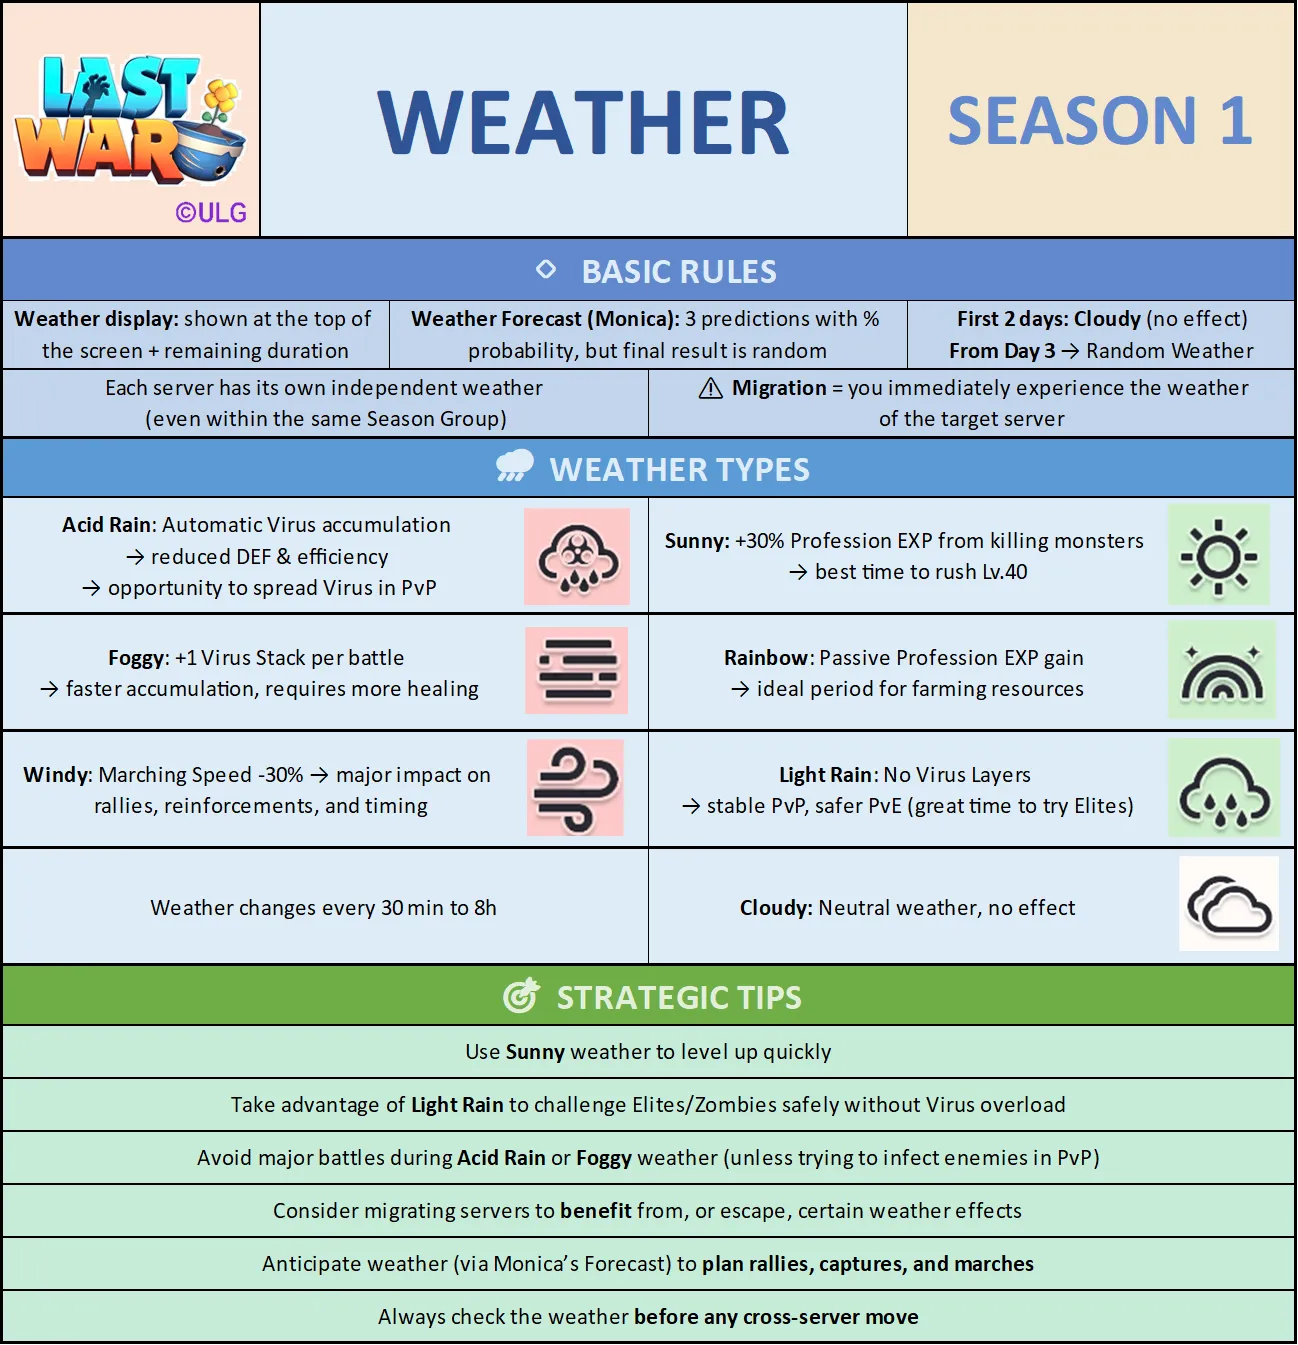
For the first 48 hours, weather remains a neutral Cloudy state. Starting on Day 3, the server activates Random Weather cycles that can change every 30 minutes to 8 hours. From this point forward, weather becomes one of the most important tactical variables in the season.
Sunny weather boosts Profession EXP from monsters by 30% and creates the best possible window to burn stamina and rush toward Level 40. Rainbow grants passive Profession EXP and is excellent for slower resource-focused play. Light Rain removes Virus Layers and creates one of the safest PvE windows for Elite testing and efficient infected clears.
Windy weather reduces Marching Speed by 30%, which makes large rallies, reinforcements, and cross-server logistics much clumsier. Acid Rain causes automatic Virus accumulation and is strongest when used aggressively in PvP. Foggy weather adds an extra Virus Stack per battle, which quickly increases healing pressure and makes prolonged fighting inefficient.
Before committing to any cross-server move, always inspect the destination server's weather. Migrating into Acid Rain or Windy conditions can turn what looked like a good tactical reposition into a major mistake.
- Use Sunny and Light Rain windows for your most valuable PvE pushes.
- Avoid launching major movement plans during Windy weather.
- Use Acid Rain deliberately if your goal is to pressure enemy players with Virus spread.
- Be careful with Foggy chains because the healing burden climbs quickly.
| Weather Type | Primary Effect | Best Strategy |
|---|---|---|
| Sunny | +30% Profession EXP from monsters | Best time to burn stamina and rush Level 40. |
| Rainbow | Passive Profession EXP gain | Perfect for long-term resource farming. |
| Light Rain | No Virus Layers | Ideal for safe PvE and testing Elite challenges. |
| Windy | -30% Marching Speed | Avoid major rallies or cross-server reinforcements. |
| Acid Rain | Auto Virus accumulation | Reduced DEF; best for spreading Virus in PvP. |
| Foggy | +1 Virus Stack per battle | Requires heavy healing; avoid prolonged fighting. |
Day 4: Kimberly's Exclusive Weapon "Rocket Shadow"
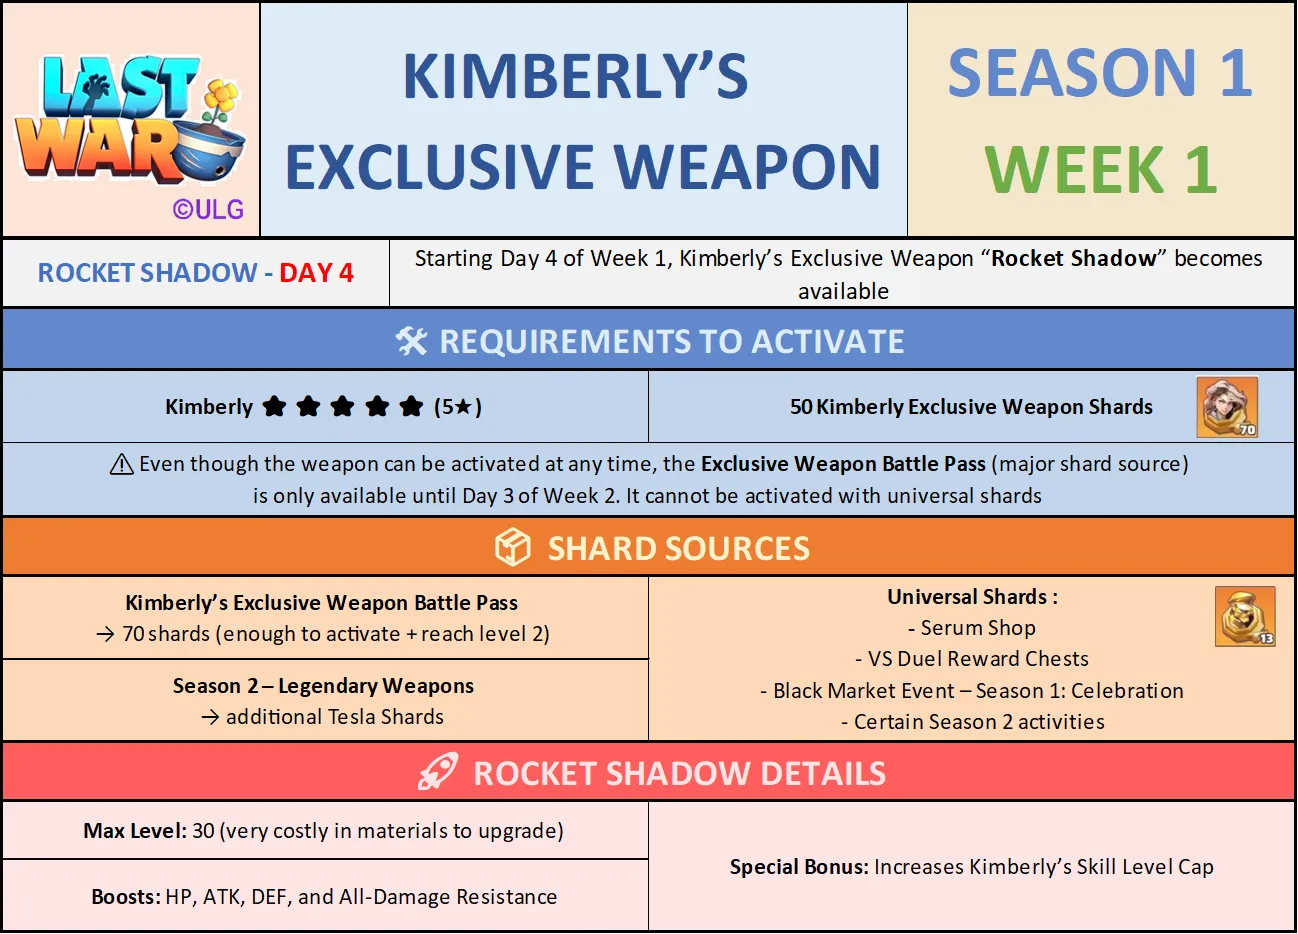
Day 4 introduces one of the biggest early power spikes available to commanders building around Kimberly: her exclusive weapon, Rocket Shadow. If your main squad revolves around her damage output, this unlock can change your entire pace of progression.
To activate Rocket Shadow, you must meet two conditions: Kimberly must already be at 5 stars, and you must have 50 Kimberly Exclusive Weapon Shards. Universal shards cannot be used for the initial activation, so this decision has to be planned in advance rather than improvised once the weapon appears.
The Exclusive Weapon Battle Pass is your primary source and gives 70 shards, which is enough not only to unlock the weapon but also to push it to Level 2 immediately. That pass expires on Day 3 of Week 2, so the timing pressure is real. After activation, additional shards can come from the Serum Shop, VS Duel Reward Chests, and the Black Market. Rocket Shadow has a max level of 30 and grants scaling boosts to HP, ATK, DEF, and All-Damage Resistance while also raising Kimberly's skill level cap.
- Activation requires 5-star Kimberly and 50 exclusive shards.
- Universal shards cannot be used for the initial unlock.
- The Battle Pass is the main shard source and expires on Day 3 of Week 2.
- Post-activation shards can come from the Serum Shop, VS Duel Reward Chests, and the Black Market.
Expert Strategies for Last War Season 1 Success
To make sure your progression does not stall, you need to think beyond the day-by-day checklist and start using the season's long-tail systems to your advantage. The strongest Week 1 players are the ones who use forecast data, migration timing, and global progression goals together instead of treating them as separate mechanics.
Use Monica's Forecast to preview the next three weather rolls and plan alliance captures around Light Rain or Sunny windows whenever possible. If your current server is trapped in harmful weather during an important war, server migration can become a strong tactical answer because you immediately inherit the destination server's weather conditions.
There is also a major War Zone milestone tied to collective repairs: if the zone repairs 2,000 Virus Research Institutes and 2,000 Protein Farms, massive reward chests become available. Alliances that contribute to these global goals early gain more long-term value than alliances that focus only on short-term fights. If you follow this upgraded Last War Season 1 Week 1 guide, you will maximize your Virus Resistance and put Kimberly in position to lead your march toward the top of the rankings.
- Use Monica's Forecast to plan ahead around the next three weather windows.
- Consider server migration when current weather makes a war or push inefficient.
- Contribute early to the 2,000 Virus Research Institute and 2,000 Protein Farm repair milestones.
Keep reading
More Season 1 guides
Previous guide
Season 1 RA Virus Guide
A detailed Last War Season 1 RA Virus guide covering infection, Virus Resistance, weather effects, cures, Permeate, and the best ways to avoid costly mistakes.
Next guide
Season 1 Week 2 Guide
A complete Last War Season 1 Week 2 guide covering Crimson Legion defense, Mason's UR promotion timing, and the best Serum Shop priorities for long-term growth.