
Season 3 Guide
The Ultimate Last War Survival Season 3 Guide: Golden Kingdom Map, Curse Resistance, Spice Wars, and Desert Protectors
The complete Last War Survival Season 3 framework guide: how Golden Kingdom changes the Season 2 model, the Spice, Mithril and Sacred Water economy, city and stronghold capture rules, Curse Resistance gates, Desert Protectors, Greenification, Sandworm Crisis, Trade Posts, the Desert Vault, Spice War plunder math, the Warlord Missile and Muse, and the Week 7 Capitol War.
Last War Survival Season 3: Golden Kingdom keeps the shape of Season 2 and rewrites most of the numbers. You still win by accumulating a seasonal resource that only cities and the alliance hub produce, you still fight over a fixed number of map blocks, and you still gate your damage behind a resistance stat. What changed is which stat, which building, and how fast tiles change hands.
This guide is the season-level reference for Golden Kingdom. It explains the Spice, Mithril and Sacred Water loop, how the capture and protection rules actually work, where Curse Resistance stops you, how Desert Protectors and Greenification layer on top of territory, and how the Spice War and Week 7 Capitol War convert preparation into ranking points.
One note before you plan around specific numbers: Season 3 rules and values are still settling, and some figures here come from community guides rather than our own captures. Where a value is unconfirmed we flag it as report-based and tell you what to verify in-game. Use this page for the framework and the decision logic, then confirm the current values on your own server before you commit resources.
Key takeaways
- Spice replaces Rare Soil as the ranked resource: cities and the Alliance Center produce it, and the season is decided on accumulated Spice, so early city captures still compound.
- Curse Resistance replaces Virus Resistance. Your rally leader's Curse Resistance applies to every member of the rally, so your highest-resistance commander should always lead serious fights.
- The capture cap rises from 10 blocks in Season 2 to 8 cities plus 8 strongholds in Season 3, and cities can be taken diagonally while strongholds cannot.
- Greenification is a second objective layered on top of raw capture: regions complete at 80 percent, and greenifying your own tile path doubles as artifact hunting.
- The Alliance Center complex is five targets, not one. Destroying the four pillar buildings first is worth 20 percent of the enemy's Spice before you ever touch the Center.
- Trade Posts are individual captures with individual stores and tax income, which makes them the best personal-value objective of the season for active solo players.
Part 1: What Season 3 Changes From Season 2
Golden Kingdom is not a fresh start, it is a reskin with three structural upgrades. The first is the ranked resource: Rare Soil is gone and Spice takes its place, still produced mainly by cities, so the Season 2 doctrine of holding production tiles as early and as long as possible carries over directly.
The second change is survival. Polar Storm punished you with cold, and you answered with heat from a High-heat Furnace. Golden Kingdom punishes you with curses, and you answer with Curse Resistance from a Curse Research Lab fed by Sacred Water. The mechanic is the same shape, but the resource chain behind it is new, so build your Sacred Water income before your resistance falls behind the map.
The third change is capacity. Season 2 limited an alliance to 6 cities and 4 dig sites. Season 3 lets you hold 8 cities and 8 strongholds, which nearly doubles your map footprint and changes how much of the map one alliance can realistically defend. There is also a brand new objective, Greenification, that is not about capturing anything at all.
- If you played Season 2 well, keep the city-first economy and rebuild the survival loop around Sacred Water.
- Do not carry Season 2 protection timings into Season 3 — tiles change hands much faster here.
- Treat Greenification as a parallel objective your whole alliance contributes to, not a side quest.
| Aspect | Season 2 — Polar Storm | Season 3 — Golden Kingdom |
|---|---|---|
| Theme | Frozen survival | Ancient desert kingdom |
| Ranked resource | Rare Soil | Spice (cities are the main producer) |
| Survival stat | Heat plus Coal | Curse Resistance (fed by Sacred Water) |
| Siege target | Alliance Furnace | Alliance Center (200,000 durability) |
| New territory layer | None | Greenification (desert to green land) |
| New hazard | Blizzards and cold waves | Sandworm Crisis |
| New units | None | Desert Protectors |
| Territory cap | 6 cities plus 4 dig sites | 8 cities plus 8 strongholds |
| City protection | About 6 days | 36 hours (report-based, verify in-game) |
Part 2: The Three Season Resources and What Each One Buys
Season 3 runs on three resources, but only one of them is scored. Spice is the ranking metric and comes from city production plus the Alliance Center, so it is the resource you are actually competing over. Mithril and Sacred Water are inputs: they upgrade the buildings that let you hold and defend the Spice you capture.
Mithril upgrades your seasonal buildings, most importantly the Blessing Fountains that produce Sacred Water. Sacred Water then levels the Curse Research Lab, which raises Curse Resistance. That chain means Mithril is effectively your resistance currency two steps removed, which is why strong alliances prioritise Mithril early even though it scores nothing.
The practical rule is to never let Sacred Water sit unspent in the early weeks. Resistance that is one tier behind the map blocks you from stronghold guards and elite rallies, and those are exactly the objectives that produce the most Mithril and Spice.
- Spice is the scoreboard: every hour your alliance holds a city is an hour of ranking points.
- Mithril turns into Sacred Water turns into Curse Resistance — treat it as a gated progression resource, not a spare.
- Spend Sacred Water into the lab continuously instead of banking it for a later upgrade tier.
| Resource | Where It Comes From | What It Is For |
|---|---|---|
| Spice | City production, Alliance Center output | The ranked resource — season ranking is accumulated Spice |
| Mithril | Digging Strongholds, Alliance Center, Wandering Mummy Warlords (Doom Walkers), Desert Ruins, radar missions | Upgrading seasonal buildings, including Blessing Fountains |
| Sacred Water | Blessing Fountains, zombie kills, quests and goals, Desert Ruins | Leveling the Curse Research Lab to raise Curse Resistance |
Part 3: The Golden Kingdom Map and the Spice Ladder
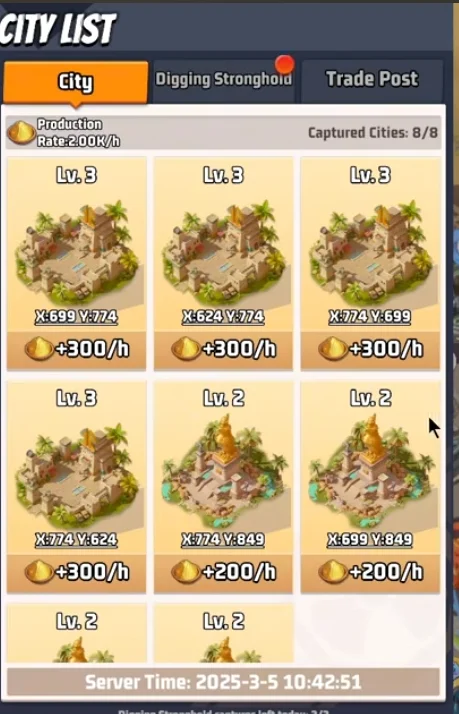
Cities in Golden Kingdom carry desert tier names instead of Season 2's industrial labels, but the ladder underneath works the same way: higher level means more Spice per hour, and the top tier exists only a handful of times on the map. A Level 1 Village produces 100 Spice per hour, and production climbs roughly 100 per level until the four Level 6 cities, which are the contested prizes of the season.
Because ranking is accumulated Spice, the level of the city matters less than the number of hours you hold it. Two Level 3 cities held from Week 2 will out-produce one Level 6 city held from Week 5, and they are far cheaper to take. That is the single most important planning insight of the Golden Kingdom economy, and it is the reason we recommend filling your city slots early with whatever tier is available rather than waiting for perfect tiles.
Strongholds run a parallel ladder for Mithril instead of Spice, adding 20 Mithril per hour for each level from 100 at Level 1 up to 200 at Level 6. Mithril is what pays for the buildings behind your Curse Resistance, so a full set of strongholds is not a luxury — it is the intake that keeps your resistance moving.
- Fill city slots early with lower tiers rather than waiting for Level 6 tiles — hours held beat tier level.
- Stronghold Mithril funds Blessing Fountains, which fund Sacred Water, which funds Curse Resistance.
- Plan the order of your 16 blocks as a route, not a shopping list, because every capture must connect to land you already hold.
| City Tier | Level | Spice Per Hour | Notes |
|---|---|---|---|
| Village | 1 | 100 | The cheap filler tier — take these early |
| Town | 2-3 | 200 / 300 | Confirmed production on live servers |
| Temple of the Sun | 4 | 400 | Mid-season unlock |
| Ancient Tombs | 5 | 500 | Contested tier |
| Square of Judgement | 6 | 600 | Only four exist on the map |
| Great Pyramid | Capitol | — | Map center, endgame objective |
| Digging Stronghold | 1-6 | Mithril: 100 / 120 / 140 / 160 / 180 / 200 per hour | Plus 20 Mithril per hour per level |
Part 4: Capture Rules, Adjacency, and the Diagonal Trap
Season 3 keeps the adjacency rule but adds a twist that catches alliances off guard: cities can be captured diagonally, while strongholds cannot. A diagonal territory connection counts for a city, but a stronghold needs a direct edge to your land. In practice that means you often take the city sitting between two strongholds first, then reach the strongholds from it — a checkerboard approach rather than a straight line.
The exception worth knowing is the center of the map, where high-level strongholds sit with no city in between, so you approach them directly. Everything else should be planned with the diagonal rule in mind, because it also works against you: an enemy alliance can slip a city diagonally into your territory and use it as a staging point.
Caps and pacing are strict. An alliance can hold at most 8 cities and 8 strongholds, may declare 2 city wars and capture 2 strongholds per day, and must expand from land it already owns. Capturing itself is a race: defeat the tile guardian with rallies, reinforce with up to 10 squads, and reach 100 percent capture progress within four hours or the attempt fails.
- Scout the diagonal approaches into your territory — that is where a hostile city can appear without warning.
- Bring the counter squad type against each guardian instead of using one default march.
- Clear the stronghold's Curse Resistance requirement before you rally, or your damage collapses.
| Rule | Season 3 Behaviour |
|---|---|
| City adjacency | Diagonal connections count — cities can be taken corner-to-corner |
| Stronghold adjacency | Direct edge required — no diagonal captures |
| Alliance cap | 8 cities and 8 strongholds (16 blocks total) |
| Daily limits | 2 city war declarations plus 2 stronghold captures per day |
| Capture race | Defeat the guardian, reinforce with up to 10 squads, hit 100 percent within 4 hours |
| Guardian types | Defender (tank-type), Striker (aircraft-type), Annihilator (missile-type) |
| Counter triangle | Aircraft beats Tank, Tank beats Missile, Missile beats Aircraft |
Part 5: Protection Windows and Why Tiles Flip Faster
Protection is the quiet rule that decides how aggressive you can be. In Season 2 a captured city sat safe for about six days, which let alliances bank territory and ignore defence for most of a week. In Golden Kingdom the reported city protection window is 36 hours, which changes the rhythm of the whole season: your holdings are contestable roughly four times as often, so a defence plan matters as much as a capture plan.
Trade Posts use a completely different model. Instead of a short protection window, the next contest for a Trade Post does not open until seven days after a capture, and the whole system closes on Spice War days. That makes a successful Trade Post grab the most stable form of map value available to an individual player.
Stronghold and Alliance Center relocation timings are less clear right now. Alliance Center relocations appear to be protected until construction finishes, and the stronghold protection duration is not publicly documented. Track both on your own server during the opening weeks, because those two numbers determine how safely your alliance can move its hub.
- Plan defence rotations around the 36-hour city window instead of assuming a multi-day grace period.
- Hold Trade Posts when you can — a seven-day lock makes them low-maintenance value.
- Log your own protection timings in Week 1 so the alliance plans on real numbers, not guides.
| Tile or Structure | Protection After Capture | Status |
|---|---|---|
| City | 36 hours | Report-based — verify on your server |
| Trade Post | Next contest opens after 7 days | Confirmed |
| Digging Stronghold | Protected, exact duration not documented | Verify in-game |
| Alliance Center relocation | Protected until construction reaches 100 percent | Report-based |
Part 6: Season Buildings and the Progression Chain
Five buildings carry the Golden Kingdom progression loop, and the order you upgrade them decides how fast you can contest the map. The Curse Research Lab is the resistance building and caps at Level 30. Blessing Fountains produce the Sacred Water that feeds it, come in four tiers, and can be leveled with Mithril; a fifth tier opens through the Season Weekly Pass.
Protector's Field stores your Desert Protectors and unlocks their skills. Our recommendation is to stop pushing it at Level 10: Level 10 unlocks the core skills, and further levels consume Mithril and Sacred Water that your resistance and fountains need more urgently in the same window. The Altar requires a Level 30 Curse Research Lab before it can be built, and then raises Desert Protector health, attack and defense by roughly half a percent per level.
The Alliance Center is the odd one out because you do not upgrade it manually. It levels from the Spice your alliance accumulates and unlocks four pillar buildings along the way, which become the targets you defend during Spice Wars.
- Front-load Blessing Fountains with Mithril — Sacred Water throughput gates everything else.
- Park Protector's Field at Level 10 while your resistance catches up.
- Do not build the Altar late and call it a Protector upgrade — it is a resistance milestone reward first.
| Building | What It Does | Key Levels and Notes |
|---|---|---|
| Curse Research Lab | Raises Curse Resistance | Leveled with Sacred Water, caps at 30 |
| Blessing Fountain I-IV | Produces Sacred Water | Leveled with Mithril, fifth tier via Weekly Pass |
| Protector's Field | Stores Desert Protectors and unlocks their skills | Level 10 unlocks core skills — go slow past it |
| Altar | Boosts Desert Protector health, attack and defense | Requires Curse Research Lab 30 |
| Alliance Center | Produces Spice and buffs nearby members; the siege target | Auto-levels from accumulated Spice, 200,000 durability |
Part 7: The Alliance Center Is Season 3's Furnace
If you understand the Season 2 alliance furnace, you already understand the Alliance Center: it is the hub your members cluster around, it produces the ranked resource, it buffs whoever sits inside its territory ring, and it is the structure your enemies want to break. The difference is that it also auto-levels from your alliance's accumulated Spice, and it unlocks four pillar buildings that become separate war targets.
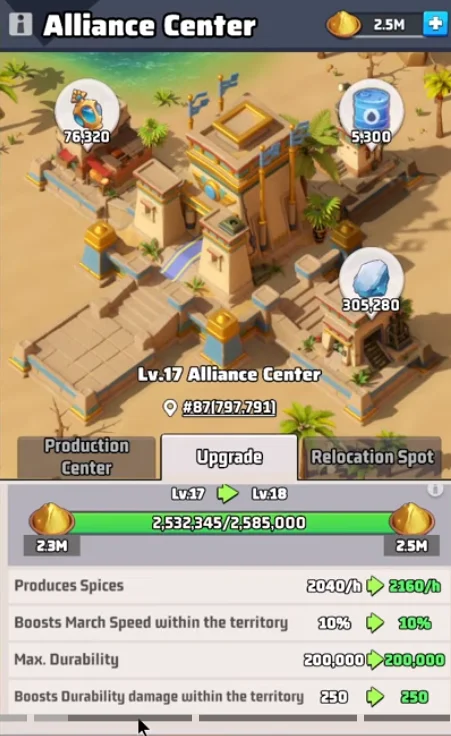
At Level 17 the hub produces roughly 2,040 Spice per hour, grants about 10 percent march speed and durability damage bonuses inside its ring, and carries a maximum durability of 200,000. Those buffs only apply within the territory ring, so members parked outside it lose both the march speed and the durability advantage — the same clustering discipline Season 2 demanded still applies.
The pillar buildings unlock at Level 5 (Mithril Plant), Level 10 (Exploratory Well), Level 15 (Sacred Water Hut) and Level 20 (Obelisk). Each one adds production value and each one is a 5 percent Spice theft target during Spice Wars, so the Alliance Center stops being a single defensive problem in the middle of the season and becomes a five-point defence problem.
- Keep every active member inside the territory ring — the buffs do not extend past it.
- Track your hub level as a countdown, because each pillar unlock adds a new building you must defend.
- Treat the 200,000 durability pool as a war-window budget, not a permanent shield.
| Alliance Center Feature | Detail |
|---|---|
| Spice production | About 2,040 Spice per hour at Level 17, rising with each level |
| Territory buffs | About +10 percent march speed and durability damage inside the ring only |
| Maximum durability | 200,000 |
| Leveling | Automatic, from accumulated alliance Spice — not manually upgraded |
| Pillar unlocks | Mithril Plant at 5, Exploratory Well at 10, Sacred Water Hut at 15, Obelisk at 20 |
| War role | The siege target in Spice Wars, plus each pillar is a separate 5 percent loot target |
Part 8: Curse Resistance Is the Real Damage Gate
Curse Resistance works exactly like the resistance stat you learned in earlier seasons: if your number is below the requirement of the target you are attacking, your damage falls off a cliff. Digging Stronghold requirements run from roughly 3,750 at Level 1 to about 10,750 at Level 6, and community reports describe damage reductions of up to 99.9 percent when you are below the threshold. In practice that means an under-resistance rally is not a weaker rally, it is a wasted one.
The mechanic most players get wrong is who the resistance belongs to. Your rally leader's Curse Resistance applies to the entire rally, which means a low-resistance player can clear high-tier content by joining a strong leader — and equally, a strong alliance can drag its resistance behind by letting the wrong player open rallies. Assign your highest-resistance commander as the default rally leader for strongholds, sandworms and war fights.
Because the Curse Research Lab is fed by Sacred Water and caps at Level 30, resistance is a throughput problem rather than a spending problem. Keep the fountains producing, keep the lab consuming, and check the requirement of your next target before you commit troops instead of after a failed rally.
- Set your highest Curse Resistance commander as rally leader for every serious objective.
- Below the requirement, assume near-zero damage — meet the threshold before you spend stamina.
- Curse Research Lab caps at 30, and the Altar unlocks only when you get there.
| Digging Stronghold Level | Reported Curse Resistance Requirement |
|---|---|
| Level 1 | About 3,750 |
| Level 2 | About 5,150 |
| Level 3 | About 6,550 |
| Level 4 | About 7,950 |
| Level 5 | About 9,350 |
| Level 6 | About 10,750 |
Part 9: Desert Protectors Are Elite and Consumable
Desert Protectors are Season 3's new elite unit, summoned through Protector's Field. They hit roughly ten times harder than normal troops, but they are a consumable rather than a standing army: losses are permanent, and they do not return after a rally unless you have specific recovery skills. Treat every Protector you send as spent, and spend them only where the outcome is worth the trade.
Your total Protector count gates your skills, which creates a second decision on top of the first. Power of Adaptation opens at 500 Protectors, Death Shockwave at 750, Blue Flame Spell at 1,000 and Protector Rally at 1,250. Protector Rally is the headline ability — it needs 1,250 stationed Protectors, runs with a one-minute countdown and triple march speed — but staying above your chosen threshold permanently is what matters, because dipping below it disables the skill you built the army for.
Where Protectors come from is unusual: they are converted from your own losses. Casualties from alliance duels and versus events, troops that exceed hospital capacity, and units lost in Drill Ground breaches enter a conversion pool, and roughly 10 percent of those losses are converted. Alliance members help by flying spy planes to speed conversion. That means a heavy fighting week literally refills your elite force, which is why the experienced play is to bank Protectors during quiet periods and unleash them in Spice Wars and the Capitol War rather than burning them on routine farming.
- Converted Protectors do not join marches automatically — add them to squads manually in the march screen.
- Stored Protectors are not lost if your base is attacked, so bank them instead of pre-emptively deploying.
- Save Protector Rally for stronghold sieges, Spice Wars and the Capitol War; routine farming does not deserve permanent losses.
| Protector Milestone | Requirement | What It Unlocks |
|---|---|---|
| Power of Adaptation | 500 stationed Protectors | First passive skill tier |
| Death Shockwave | 750 stationed Protectors | Area damage skill |
| Blue Flame Spell | 1,000 stationed Protectors | Higher damage skill |
| Protector Rally | 1,250 stationed Protectors | Rally ability, 1-minute countdown, triple march speed |
| Protector's Oath | Profession skill, Level 50 | Instantly grants Protectors |
| Indomitable Will | Profession skill, Level 70 | Recovers up to 10 percent of Protectors lost |
Part 10: Greenification — the Second Objective
Greenification has no Season 2 equivalent. Instead of capturing a tile, you convert desert sand into green land, and you can only greenify tiles adjacent to land that is already green. A region counts as complete at 80 percent greenification, which unlocks access to the next region, and the whole system is gated by season stage: in the first stage you cannot start greenifying until you capture a city, and strongholds, trade posts and the Capitol stay locked. In the later stage the system expands cross-warzone toward the Great Pyramid.
You greenify by dispatching Recon Planes at 10 stamina each. Profession skills widen the effect: Double Greenification covers a 3x3 area and Nature's Touch covers 9x9, which turns a single dispatch into a much larger contribution. The same action also uncovers Desert Artifacts hidden under the tiles, with a daily cap on artifact rewards, so a greenification session pays out twice.
Two practical details are worth more than they look. First, greenifying a diagonal tile costs the same stamina as a straight one but connects more land, and each dispatch grants profession experience — one of the cheapest experience sources in the season. Second, around ten Sphinx statues sit on the map and activate once the land around them is green; tapping a lit statue claims a reward that is available once per player in your warzone, unlike the competitive Desert Artifacts.
- Start greenifying immediately after your first city capture — it is a hard gate, not a suggestion.
- Target diagonal tiles when you can: same stamina, more connected land, same experience payout.
- Sweep the map for lit Sphinx statues each week; they are free personal rewards that most players forget.
| Greenification Feature | Detail |
|---|---|
| Rule | Only sand adjacent to already-green land can be converted |
| Region completion | 80 percent green land unlocks the next region |
| Stage gating | Early stage requires a city capture first; later stage pushes toward the Great Pyramid |
| Cost | 10 stamina per Recon Plane dispatch |
| Skill scaling | Double Greenification = 3x3, Nature's Touch = 9x9 |
| Side rewards | Desert Artifacts (daily cap) plus 4,000 profession experience per dispatch |
| Sphinx Oasis | Around 10 statues, each claimable once per player, revealed by green land |
Part 11: Sandworm Crisis and the Three Worm Sizes
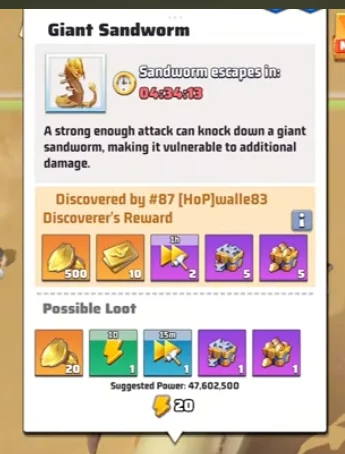
Sandworms are Golden Kingdom's roaming hazard and its main early currency faucet at the same time. All Season 3 sandworms are missile-type, so tank squads are the correct answer and the damage difference is large. A strong enough hit knocks a giant worm down and opens it to extra damage, which is why coordinated rallies finish giants far faster than a stream of single attacks.
The three sizes demand three different responses. Small worms can be handled solo, but they trap your base in place and block troop deployment until they are cleared. Large worms need a rally and can knock your base to a random position on the map, so staying inside Alliance Center territory is your insurance against losing your map position. Giants require a Trap Landmine to catch first, then an alliance kill; if nobody kills one within roughly five hours it despawns, and the surrounding land is desertified while it lives.
Sandworm Scales are the reward currency and they feed the Desert Bazaar, so the Crisis is not optional content — it is your seasonal store income. You earn scales from daily tasks such as dealing damage and participating in kills, plus milestone goals. If a small worm traps you, resist the urge to teleport away: leaving makes the worm vanish and forfeits the reward for everyone who was about to clear it.
- Bring tank squads: every Season 3 sandworm is missile-type.
- Park inside Alliance Center territory so a large worm cannot displace your base.
- Never teleport out of a small worm trap — the worm disappears and the reward is lost.
| Sandworm Size | How To Handle It | What It Threatens |
|---|---|---|
| Small | Soloable — clear it quickly for your ally | Traps the base and blocks troop deployment |
| Large | Rally required | Can knock your base to a random map position |
| Giant | Trap Landmine to catch, then an alliance kill | Around 47.6M suggested power, 20 stamina, despawns after roughly 5 hours |
Part 12: Heroes With Monster Damage Bonuses
Some heroes carry Season 3 monster-combat bonuses that apply to stronghold guardians, sandworms and curse monsters. These are small percentages, but they apply to exactly the fights that gate your progression, and they cost nothing to use — you simply field the right hero in the right rally.
Marshall and Schuyler both add 10 percent damage against monsters, which makes either of them a natural fit for guardian and worm rallies. Scarlett reduces incoming monster damage by 5 percent, which is the better pick when your alliance is pushing a target that is killing your squads faster than you can replace them. McGregor is also reported to carry a monster bonus, though the value is not yet confirmed.
The hero calendar matters here as much as the bonuses. A Scarlett UR upgrade event runs in Week 3 from Day 1, and a Schuyler Exclusive Weapon pass opens on Day 4 of the same week. If you plan to lean on either hero during the mid-season push, line up your shards and materials before those windows arrive rather than scrambling during them.
- Put Marshall or Schuyler in front when you need raw monster damage; use Scarlett when survivability is the bottleneck.
- Prepare Scarlett UR materials before the Week 3 event window opens.
- Keep the Schuyler weapon pass in mind when you plan Week 3 spending.
| Hero | Season 3 Monster Bonus |
|---|---|
| Scarlett | 5 percent less damage taken from monsters |
| Marshall | 10 percent more damage to monsters |
| Schuyler | 10 percent more damage to monsters |
| McGregor | Reported monster bonus — value not yet confirmed |
Part 13: The Two Cosmetics That Actually Matter
Golden Kingdom has two cosmetic items with real mechanical value, which is unusual enough to be worth planning around. The first is the Meow-lody skin. Equipping it grants 5 percent hero attack, and simply holding it in stock grants that attack bonus plus 5 percent hero defense, which means the skin pays out even before you wear it.
Meow-lody also raises Protector's Field capacity by 500 and unlocks the Summon Protectors base skill while held, and it turns incoming base likes into a gift from the desert for the person who liked you. It was sold on Day 5 of the pre-season in the coupon store for 4,000 coupons. If you intend to build a serious Protector army, this skin is effectively a capacity upgrade with cosmetics attached.
The second is the Eternal Pyramid decoration, which raises your Desert Protector conversion rate by 1 percent. That sounds trivial until you remember that Protectors come from converted losses — a higher conversion rate compounds across an entire season of fighting, so alliances that fight a lot get measurably more elite units from the same casualties.
- If you are building Protectors, Meow-lody is a capacity upgrade first and a skin second.
- The Eternal Pyramid compounds all season — build it early rather than at the end.
- Check the coupon store during the pre-season window; the skin was a limited-day listing.
| Cosmetic | Mechanical Value |
|---|---|
| Meow-lody skin (equipped) | 5 percent hero attack |
| Meow-lody skin (held in stock) | 5 percent hero attack, 5 percent hero defense, +500 Protector's Field capacity, unlocks Summon Protectors |
| Meow-lody social perk | Liking a base that wears it grants a desert gift, once per person per base |
| Meow-lody price | 4,000 coupons on Day 5 of the pre-season |
| Eternal Pyramid decoration | 1 percent higher Desert Protector conversion rate plus extra pyramid effects |
Part 14: Season Events and Desert Bazaar Spending
The season hub runs for roughly 48 days and bundles the Golden Realm event track with the Desert Bazaar store. Most of it is familiar: a season battle pass with target missions, a weekly pass that also unlocks the fifth Blessing Fountain tier, and recurring combat events. Two entries deserve special attention because they shape your week: the Sandworm Crisis, which is your scale income, and Return of the Dead, a defensive event in Weeks 2 to 4 where mummies assault your Alliance Center in 30 escalating waves on Tuesdays and Fridays.
Return of the Dead is the S3 equivalent of the Season 2 furnace defence: every member reinforces once, the alliance holds the waves, and the reward tier scales with how deep you survive. It also doubles as a Protector refill, because the casualties you take feed the conversion pool.
In the Desert Bazaar, the community-consensus spending order is Mithril first, then Sacred Water, then Protector Horns. The reasoning is straightforward: Mithril and Sacred Water convert directly into the resistance and building levels that gate the map, while Protector Horns only matter once your Protector army is already large enough to use them well. Buy the progression resources while they are the bottleneck, and pick up Horns later in the season when your other tracks are caught up.
- Reinforce Return of the Dead every Tuesday and Friday — the reward tier is alliance-wide.
- Spend Bazaar currency on Mithril and Sacred Water while resistance is your bottleneck.
- Treat Protector Horns as a late-season purchase, not an early one.
| Event or Store Item | What It Is |
|---|---|
| Sandworm Crisis | Daily tasks and milestones that pay Sandworm Scales |
| Return of the Dead | Weeks 2-4, Tuesdays and Fridays — 30 escalating waves against your Alliance Center |
| Season Battle Pass | Reward track with target missions such as helping allies with Vault stones and greenifying tiles |
| Weekly Pass | Weekly rewards plus the fifth Blessing Fountain tier |
| Desert Bazaar | Seasonal store that spends Sandworm Scales |
| Signature store items | Protector Horn, Desert Compass, Archaeologist Hammer, Landmine Trap Refill, plus chests, speedups and gear |
| Spending priority | Mithril, then Sacred Water, then Protector Horns |
Part 15: Trade Posts — the Individual Governor Game
Trade Posts are the one Season 3 objective that belongs to a player rather than an alliance. They unlock in Week 2, each one runs its own store that is open to everyone in the season group, and whoever holds the post — the Governor — earns tax from it. That combination makes Trade Posts the highest personal-value target on the map for active solo players.
Capturing one is a race rather than a siege. Your base must be inside the post's contaminated land to attack it, and commanders from any enemy warzone can contest the same post. Each contest lasts one hour, progress is tracked per commander rather than pooled across the alliance, and the first commander to 100 percent wins. If nobody reaches 100 percent, the commander with the highest progress wins — unless the post already has a Governor, in which case the incumbent keeps control.
Holding one is comfortable. After a capture the next contest does not open for seven days, and Trade Posts close entirely on Wednesdays and Saturdays so they do not collide with Spice Wars. A Governor can summon a Trade Caravan once to restock the store, and tax is paid out in Golden Eggs when items sell out or when the Governor leaves the post.
- Relocate next to a post before the contest window — you cannot attack one you are not adjacent to.
- Progress is personal, so a strong solo commander can take a post without alliance help.
- If you win one, hold it: a seven-day lock plus Golden Egg tax is the best return on a single afternoon of effort.
| Level | Contest Opens |
|---|---|
| Level 1 | Sunday, Day 7 of Week 2, 12:00 server time |
| Levels 2-5 | Across Days 1-5 of Week 3 |
| Level 5 | Friday, Day 5 of Week 3, 12:00 server time |
Part 16: Desert Vault and the Mithril Mini-Game
The Desert Vault, also labelled Desert Treasure, is a stone-smashing mini-game that opens in Week 2 and pays out heavily in Mithril. You spend Archaeologist Hammers to break stones, one hammer per stone, and clear the stones sitting above the relics underneath. The board asks you to uncover three relics, after which you open the chest for the reward.
The value here is that Mithril is the input behind Blessing Fountains, which produce the Sacred Water that feeds Curse Resistance. Vault runs are therefore a direct resistance accelerator, not a side activity. Reported rewards reach into the hundreds of thousands of Mithril, alongside a Universal Exclusive Weapon Shard, resource chests and speedups.
You locate vaults with Desert Compasses bought from the Desert Bazaar, and the hammers come from a recurring quest-giving character. Multiple vaults are available each day through the end of the season, so the correct habit is a short daily pass rather than a single marathon session.
- Run the Vault daily — Mithril from vaults feeds the resistance chain faster than farming alone.
- Buy Desert Compasses to locate vaults instead of wandering the map looking for them.
- Break the stones above relics first; clearing the whole board is not required.
Part 17: Spice Wars and the 30 Percent Plunder Math
Spice War is Season 3's headline PvP system and the direct successor to Season 2's Rare Soil War, with one critical upgrade: the siege target is not a single building. The Alliance Center complex counts as five separate objectives, and each one you destroy hands you a fixed slice of the defender's Spice. The four pillar buildings are worth 5 percent each and the Center itself is worth 10 percent, for a maximum of 30 percent stolen in a single war.
That structure produces the single most important tactical rule of the season: destroy the four pillars first and the Center last. The Center is the toughest, most heavily garrisoned structure in the complex, and alliances that tunnel on it routinely run out of war time having taken a fraction of what was available. Because you keep every slice you destroy even if you lose the war, the pillar damage is banked value — take it before you gamble on the Center.
Defensively the same math reverses. Station squads on all four pillars, not just the Center: every undefended pillar is a guaranteed 5 percent loss, and three ignored pillars give the attacker 15 percent before they even engage your main defence. Each structure can hold up to 100 garrison squads, and eight war rounds run across the season on Wednesdays and Saturdays from Week 4. One practical warning: attacking an Alliance Center removes your own shield, so commit deliberately rather than poking at it.
- Attack order: four pillars first, Center last — you keep stolen Spice even when the war is lost.
- Defend all four pillars with garrison squads; undefended pillars are free income for the attacker.
- Your Spice baseline for the round locks at the start, so keep producing and capturing anyway.
| Target in the Alliance Center Complex | Spice Stolen If Destroyed |
|---|---|
| Mithril Plant (pillar 1) | 5 percent |
| Exploratory Well (pillar 2) | 5 percent |
| Sacred Water Hut (pillar 3) | 5 percent |
| Obelisk (pillar 4) | 5 percent |
| Alliance Center itself | 10 percent |
| Maximum per war | 30 percent |
Part 18: The Warlord Missile and the New Muse Skill
The Warlord Missile returns from Season 2 with the same high-risk profile. The attacking alliance's Warlord can launch it during either the Preparation or War stage, and it resolves unless their base is breached within a three-minute window. When it lands it converts a 35x35 tile area into Contaminated Land, which does two things at once: it damages the defender's structures and it opens a forward-staging area that attackers can teleport into for the rest of the fight.
Both sides have a clear job during those three minutes. Attackers should wall the Warlord's base with squads and shields so the launch cannot be interrupted, because a failed launch costs a 72-hour cooldown and removes the missile from the following round. Defenders should watch the reveal and throw everything at the Warlord's base to break it before the timer ends — an aborted missile is a full war-swing prevented.
Season 3 adds a second war skill: the Muse. Where the Warlord missile relocates territory, the Muse summons a mummy army onto the defender's map with a 25x25 hit area and a three-minute preparation window, and it must be launched from the defender's map. The detail that catches alliances out is that shields block the Summon Mummies profession skill but not the Muse's war skill — so you need dedicated protection for both your Warlord and your Muse, not one guard squad shared between them.
- Assign dedicated defenders to hunt the enemy Warlord as soon as the location is revealed.
- Protect your own Warlord and Muse with separate squads — one is not enough.
- A cancelled missile costs your attacker a full round of pressure, so do not launch without cover.
| Skill | Who Uses It | Effect and Counterplay |
|---|---|---|
| Warlord Missile | Attacking alliance's Warlord (R5) | 3-minute window; 35x35 area becomes Contaminated Land; breaching the Warlord's base cancels it and sets a 72-hour cooldown |
| Muse war skill | Attacking faction's Muse | Summons a mummy army on the defender's map, 25x25 area, 3-minute prep; shields do not block it |
| Summon Mummies (profession skill) | Any qualifying player | Similar summon, but shields do block this version |
Part 19: Faction Duel and the Week 7 Capitol War
Season 3 splits the server's warzones into two factions, the Scarlet Legion and the Golden Tribe, and the split is decided in Week 3. The two strongest warzones become faction leaders, the remaining six choose a side, and compositions lock before Spice Wars begin. If your warzone ends up without a faction, you do not get Spice Wars at all, which is why the Week 3 alignment days are the most consequential diplomatic window of the season.
Each faction then contests invasion rights across Days 1 to 6 of Week 7. Points come from Alliance Duel performance, Trade Truck plunder, Storm Arena results and Desert Storm activity. The faction with more points earns attack initiative in the Capitol War, and the losing faction plays defence of its highest-Spice warzone. That makes the Week 7 preliminary a faction-wide economy check: the faction that kept its members active across every scoring event arrives with the initiative.
Capitol War itself runs on Day 7 at 12:00 server time, and the payoff numbers are large enough to justify planning around them alone. Capturing and holding the Capitol is worth 10 million Spice, and each Giant Cannon is worth 5 million. The most common mistake is fixating on the Capitol while leaving the Cannons untouched — those Cannons also auto-fire on the Capitol to speed your capture, so taking them is both score and siege support. Around the structure, four Missile Factories are alliance-capturable and each auto-produces a missile every five minutes, while the Duel Missile deals 5,000 damage to every base in its blast radius, including allies, so positioning matters as much as damage.
- Win the Week 3 alignment decision — no faction means no Spice Wars for the whole season.
- Score in every preliminary event, not just combat: the points decide who attacks the Capitol.
- In the Capitol War, clear Cannons and Missile Factories instead of tunnelling on the Capitol alone.
- Hold your best Desert Protectors for the Capitol War; it is the fight that decides the season.
| Week 7 Element | Detail |
|---|---|
| Days 1-6 | Faction-wide race for invasion rights, scored from Alliance Duel, Trade Truck, Storm Arena and Desert Storm |
| Capitol War timing | Day 7, Sunday, 12:00 server time |
| Capitol value | 10 million Spice for capture and hold |
| Giant Cannons | 5 million Spice each — they also auto-fire on the Capitol and speed its capture |
| Missile Factories | Four around the Capitol, alliance-capturable, auto-produce a missile every 5 minutes |
| Duel Missile | 5,000 damage to every base in its blast radius, allies included |
Part 20: Season 3 Week-by-Week Roadmap
Golden Kingdom follows the same eight-week funnel as Season 2, with the resistance and greenification layers added. Week 1 is setup: fountain and lab loop, Protector's Field to Level 10, first city capture, and your first greenification. Week 2 adds Trade Posts, Desert Treasure vaults and Return of the Dead defences, while city tiers climb.
Week 3 is the diplomatic pivot — faction alignment locks — plus the Scarlett UR window and the Schuyler weapon pass. Week 4 opens Spice Wars and shifts the season from growth to conversion: everything you built in the first three weeks is now being scored, stolen or defended twice a week. Weeks 5 and 6 are the grind of holding pillars, replacing Protector losses, and pushing greenification toward the next region.
Week 7 is the climax: the faction duel decides invasion rights, and the Sunday Capitol War can move tens of millions of Spice in a single afternoon. Week 8 is settlement, where contribution is reviewed and reward tiers are assigned, so the alliance work of the whole season is finally cashed out.
- Weeks 1 to 3 build the base: resistance, fountains, Protectors and early city hours.
- Weeks 4 to 7 convert that base into Spice through wars, plunder and the Capitol.
- Week 8 is administrative but decisive — contribution rules decide who receives the season rewards.
| Week | Primary Focus |
|---|---|
| Week 1 | Blessing Fountain and Curse Research Lab loop, first city, first greenification |
| Week 2 | Trade Posts unlock, Desert Vault, Return of the Dead defences |
| Week 3 | Faction alignment locks, Scarlett UR event, Schuyler weapon pass, higher city tiers |
| Week 4 | Spice Wars begin (Wednesday and Saturday rounds) |
| Week 5 | Region push through greenification, pillar defence, Protector management |
| Week 6 | Sustained Spice War pressure and stockpile protection |
| Week 7 | Faction Duel preliminary, Capitol War on Sunday |
| Week 8 | Settlement, contribution review and reward assignment |
Part 21: Opening-Week Checklist for Golden Kingdom
The first week of Season 3 sets the pace for everything that follows, and the tasks that matter most are the unglamorous ones. Work through this list in order: it front-loads the resistance chain, secures your first Spice hours, and puts your alliance in position for the Week 2 unlock wave.
Two items deserve emphasis. First, your first city capture is a hard gate for Greenification — until you hold a city you cannot greenify at all, so delaying the capture delays an entire alliance objective. Second, do not move members out of the Alliance Center ring to chase distant tiles early; the ring buffs and the protection from large Sandworm displacement are worth more than a slightly better low-tier tile.
- Start Blessing Fountains immediately and push Mithril into them before anything cosmetic.
- Keep Sacred Water flowing into the Curse Research Lab so your resistance tracks the unlock schedule.
- Level Protector's Field to 10 for the core skills, then pause and redirect resources to resistance.
- Capture a Level 1 city in the first days — it gates Greenification and starts your Spice clock.
- Begin greenification right after that capture, using diagonal tiles where possible for efficiency.
- Join every Sandworm Crisis daily task for Scales, and keep tank squads ready for the kills.
- Keep your base inside Alliance Center territory to avoid large-worm displacement.
- Confirm your alliance's Week 3 faction alignment plan early — it decides whether you get Spice Wars.
Keep reading